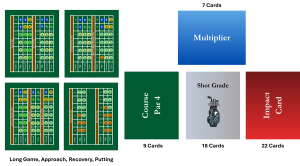
Shuffle the Course, Shot Grade, and Impact Card decks thoroughly. Place them face down, side by side, in the center of the table.
Place the Multiplier deck face down next to the other decks.
Shuffle the Outcomes deck — which includes Long Game, Approach, Recovery, and Putting category cards for both Normal and Hard difficulties. Draw the top card from each category and place them face up beside the other decks. These serve as your reference cards for determining shot outcomes. For a gentler round, choose all ‘Normal’ cards. For a tougher challenge, go ‘Hard’ mode!
Each player receives a full set of 9 Ball Position Cards: Holed (H), Short Putt (SP), Long Putt (LP), Greens Bunker (GB), Short Fairway (SF), Rough (R), Fairway Bunker (FB), Long Fairway (LF), and Out-of-Bounds/Water (OOB/OW).
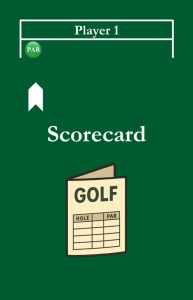
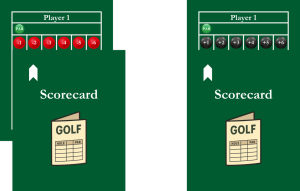
Give each player two Score Cards — red for under-par scores and black for over-par scores. Each is labeled by player number (1–4).
Stack your Score Cards together on the table. The top card (face down) should have its arrow pointing toward the green “PAR” bubble on the bottom card. This represents your starting score.
Each player draws two Impact Cards from the deck. Keep them secret — these can change your fate on the fairway!
Flip the top Course Card. The back shows the hole’s par, and the front shows the layout and potential outcomes. Keep the front face up for all to see their course position.
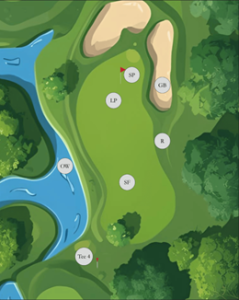
Each player begins from the indicated tee position (Tee 3, Tee 4, or Tee 5). Player 1 goes first, choosing a shot type — Aggressive, Neutral, or Defensive. The relevant category card shows possible outcomes for that phase of play.
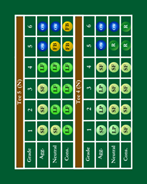
Draw the top card from the Shot Grade deck. Find your shot outcome on the Outcomes Table: Match your chosen row (Aggressive, Neutral, or Defensive) with the drawn Shot Grade (1-6). The intersection shows where your ball lands!
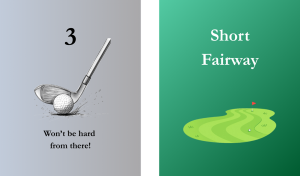
Place your matching Ball Position Card on the table to mark where your ball now lies. Example: If you were on the Tee on a Par 4, the relevant table would be Tee 4, and if you drew the Shot Grade Card 3, you would land on the Short Fairway. Place your SF card face up on the table.
Play proceeds with Player 2 following the same steps — choose a shot type, draw a Shot Grade Card from the unused Shot Grade deck, and update their Ball Position. Note: The Shot Grade deck is only recycled after 10 Shot Grade Cards have been picked. See more on this under the Deck Management section.
The player farthest from the hole always plays next. If two players share the same position, the one who landed there first plays first.
The Ball Position order (excl. Tee) is below, from farthest to closest to the hole.
Continue alternating turns until each player lands on the ‘Holed (H)’ position. Once holed, that player’s turn for the hole is complete.
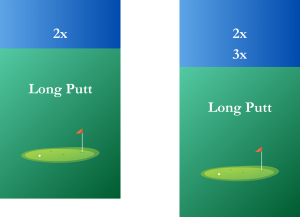
When playing a hole, the ball position may be repeated (Example: a player hits the ball from a Long Putt to a Short Putt but then goes back to Long Putt after the next shot). In this case, the player uses a Multiplier and places the Ball Position Card that is repeated on top of the Multiplier. If it is their second time in that position, the “2x” multiplier is displayed. If it is the third time, the “3x” multiplier is displayed, etc.
When everyone finishes the hole, count how many shots each player took — one per Ball Position Card used (including ‘Holed’). Note: The OOB/Water (OW) counts as **two strokes**, and any multipliers should increase the shot count accordingly for that ball position.
The maximum per hole is **three over par (+3)**. If a player reaches this, they record +3 and stop playing that hole.
After counting, players retrieve their Ball Position Cards for the next hole, and return any Multiplier Cards back to its deck.
Update your Score Cards by adjusting the arrow to match your new total score. Example: If you were at PAR and finished 2 under, move your arrow to “-2”, or if you were on “-2” and finished 3 over, move you arrow to “+1”, etc.
The player with the lowest score at the end of all holes wins, followed by the second lowest, etc.
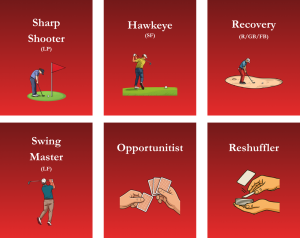
Sharp-Shooter (LP) / Hawkeye (SF) / Recovery (FB, R, GB) / Swing Master (LF): Excludes the worst shot grade available (Shot Grade 6), but only if your current ball position matches the one listed on the Impact Card. For example, Sharp-Shooter can only be played if the ball position is a Long Putt, while Hawkeye can only be played if the ball position is in the Short Fairway - similar for the others. If you play two of the same Impact Cards, you can exclude the two worst shot grades instead of just one (Shots Grades 5 and 6). You can’t play three of the same at once.
Opportunist: Lets you reuse one of the last two discarded/used Impact Cards — perfect for a comeback!
Reshuffler: Lets you collect all used Shot Grade Cards and reshuffle the deck. Can be played on any ball position.
The maximum per hole is **three over par (+3)**. If a player reaches this, they record +3 and stop playing that hole.
After counting, players retrieve their Ball Position Cards for the next hole, and return any Multiplier Cards back to its deck.
Update your Score Cards by adjusting the arrow to match your new total score. Example: If you were at PAR and finished 2 under, move your arrow to “-2”, or if you were on “-2” and finished 3 over, move you arrow to “+1”, etc.
The player with the lowest score at the end of all holes wins, followed by the second lowest, etc.
Impact Cards must be used before you declare your shot type (Aggressive, Neutral, or Defensive), and they cannot be used when teeing off (Tee 5, Tee 4, Tee 3).